How to glue PVC Fittings

While the title of this blog post is 'How to Glue PVC Fittings', it's not quite accurate; PVC fittings are solvent welded together, not glued. In today's blog post, we're going to review the best practices for creating a solvent weld between two different pieces of PVC. Most solvent cement has a shelf life of around three years, so be sure to check when your solvent was purchased to ensure your PVC will weld properly.
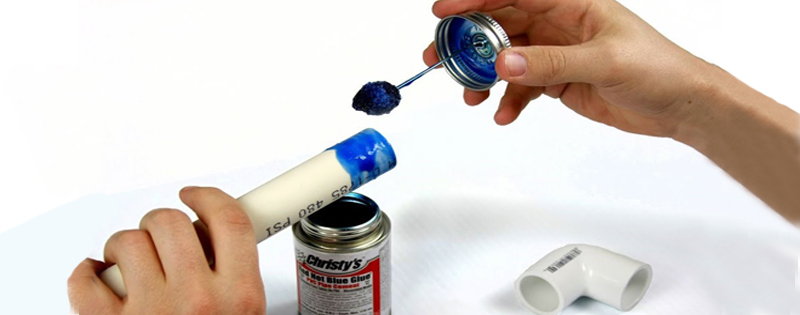
Gather all the relevant materials
Before we can begin, we'll need to ensure that we've got the right materials for our job. When gluing two pieces of PVC, we need the following:
- Both pieces of PVC
- PVC Primer
- PVC Solvent Cement
- Pipe Cutter
- Beveler or deburring tool
- A dry cloth
Preparing the PVC for gluing
The first step in preparing the PVC to be glued is to inspect both pieces of PVC for debris or other material on the pipe. If there's anything there, it should be removed. If you're gluing a piece of pipe and a fitting, you'll need to first ensure that you've got a clean cut on the piece of pipe; ensure that the cut is square. Next, you need to take the beveler or deburring tool and bevel the end of the PVC to be inserted into the fitting. Ensure the fitting fits properly by inserting the fitting onto the pipe and making sure there is the interference; the interference is caused by the internal stop on the fitting. If there's no interference, the fitting should not be used. Mark the spot on the pipe where the fitting terminates to ensure it's fully inserted later.
Once we've ensured that the fitting can be used for our application and marked our pipe, it's time to ready the pipe to be 'glued'. Before we can use the solvent cement to weld the pipe together, we need to soften the pipe with PVC primer. Apply PVC primer to the fitting, then the pipe, then the fitting again. Once applied, lightly scratch the PVC; it should scratch easily after priming; if it doesn't, your primer has gone bad.
'Gluing' the PVC Together
Once we've properly primed the PVC, we need to work quickly to ensure that the PVC doesn't have time to harden. Apply the solvent cement in a circular motion around the pipe, then a thin layer onto the fitting, then finally onto the pipe again. Be sure to apply the cement as evenly as possible; avoid applying excess cement inside the fitting.
At this point, you're ready to join the pipe and the fitting. While you're pushing the fitting onto the pipe, use a quarter turn to ensure the solvent cement doesn't bunch at the end of the fitting. By the end of the quarter-turn, the fitting should be flush against the interference point; you should also be flush against the mark you made on the pipe earlier when testing for fit.
Finishing Steps
At this point, you're just about finished. If you've done everything properly, you should have a bead around the fitting. If you don't have a bead around the fitting, there's a chance your weld isn't 100% solid. Clean the excess solvent cement and allow the fitting and pipe to settle; it takes time for the solvent weld to truly set. The amount of time varies by the type of primer and size of the pipe; you can check how long you should let the fitting sit below:

If you've got any questions about how to weld a PVC fitting and piece of pipe, leave them below. If you liked this article, please check out more of our content, including these great related blog posts below. As always, be sure to like and subscribe to us on Facebook, Instagram, Pinterest, or Twitter to keep apprised of the latest and greatest in drainage technology as well as get the latest exclusive deals! If you're making your first purchase, sign up for the newsletter to get a 1-time-use 5% off coupon!


About the Author


Comments